How to Use T-shirt Transfer Paper
by Anthony Clark · April 03, 2022
Have you ever pulled a custom shirt out of the wash to find the design cracking and peeling after just one cycle? That single frustrating moment almost always traces back to one thing: not knowing how to use transfer paper correctly. The good news is that the process is not complicated — it just requires following a specific set of steps in the right order. Get those steps right, and you end up with sharp, vibrant prints that hold up through dozens of washes.
Transfer paper is a coated sheet that carries your printed design until heat bonds it permanently to fabric. There are inkjet versions, laser versions, light-fabric varieties, dark-fabric varieties — and each one plays by slightly different rules. If you have ever looked into how to print on transfer paper for a t-shirt, you already know that printing is only half the battle. The pressing and peeling steps are where most transfers succeed or fail.
This guide covers the full picture: what transfer paper is, how to pick the right type, the exact steps for a clean transfer, and the mistakes that quietly ruin results. If you are thinking about turning this skill into something bigger, pair it with our guide on how to start a t-shirt printing business. Now, let us walk through it from the beginning.
Contents
What Transfer Paper Is and How It Works
Transfer paper — also called iron-on or heat transfer paper — is a specially coated sheet designed to hold printed ink on its surface until heat releases it onto fabric. Think of it as a temporary home for your design. You print the image, place the paper face-down on the shirt, apply heat, and peel away the backing. What remains is your design bonded directly into the fabric fibers.
The coating does all the heavy lifting. It traps ink during printing, then activates under heat to create an adhesive bond with the fabric. If the temperature is too low, the bond fails. Too high, and you scorch the shirt or distort the image. The paper type, the fabric content, and the heat source all interact — which is why understanding the basics before you start saves you from wasting materials on failed transfers.
Inkjet vs. Laser Transfer Paper
Your printer type determines which transfer paper you need. Inkjet transfer paper is made for inkjet printers, which spray liquid ink onto surfaces. Laser transfer paper is engineered for laser printers, which fuse dry toner with heat. The coatings on each type are chemically different, so using the wrong paper in your printer gives you poor ink absorption, washed-out colors, and a transfer that will not bond correctly. Always confirm your printer type before purchasing. If you are still deciding on a machine, our roundup of top-rated printers for home and small studio use breaks down which models handle transfer printing best.
Light Fabric vs. Dark Fabric Paper
Beyond the printer type, you need to choose between light-fabric and dark-fabric paper. Light-fabric paper is nearly transparent after transfer — the design appears to sit directly on the shirt with no visible background, which looks clean and natural on white and light-colored garments. Place it on a dark shirt, though, and the design disappears into the fabric entirely. Dark-fabric paper solves this with a white backing layer that makes your colors visible on black, navy, or deeply toned shirts. The trade-off is a noticeable white rectangle framing the design. Knowing your fabric color before you shop prevents this mismatch and saves you a wasted print run.
Choosing the Right Paper for Your Project
Transfer paper packaging tends to be specific, and reading it carefully pays off. You need to match three things before you buy: your printer type, your fabric color, and your fabric content. Get all three right, and the rest of the process becomes significantly smoother.
Reading the Label Before You Buy
Most transfer papers list compatible fabric types on the packaging. Cotton transfers most reliably — the fibers bond well with the adhesive layer under heat. Polyester is harder because it resists heat bonding and can scorch at the temperatures a clean transfer requires. Blended fabrics fall in between. Check the recommended pressing temperature on the label and compare it to what your iron or heat press can consistently deliver. Papers that call for 375°F will not perform well if your iron maxes out at 300°F. That gap shows up immediately as poor adhesion or a peeling edge after the first wash.
| Paper Type | Best For | Printer Compatibility | Fabric Color | Edge Appearance |
|---|---|---|---|---|
| Inkjet Light Fabric | White and light-colored shirts | Inkjet only | Light | No visible border |
| Inkjet Dark Fabric | Black and deep-colored shirts | Inkjet only | Dark | White backing visible |
| Laser Light Fabric | White and light-colored shirts | Laser only | Light | No visible border |
| Laser Dark Fabric | Black and deep-colored shirts | Laser only | Dark | White backing visible |
| Printable Vinyl | High-durability designs, any color | Inkjet or laser | Any | Trim to edge, no border |
Specialty and Printable Vinyl Options
Printable vinyl is worth considering when you want cleaner edges and a longer-lasting result. Unlike standard transfer paper, printable vinyl sits on top of the fabric as a thin flexible film rather than bonding into the fibers. You weed (cut away) the background before pressing, which eliminates the rectangular border entirely. The finish is slightly firmer to the touch but holds up exceptionally well through repeated washing. It is a natural next step once you have the basics of heat transfer paper down and want to expand your output options.
How to Use Transfer Paper: Step by Step
Once you have the right paper in hand, the transfer process follows a clear, repeatable sequence. Rushing any part of it — especially the pressing or peeling stages — is where results fall apart. Here is how to do it correctly from start to finish.
Preparing and Printing Your Design
Before you print anything, you need to mirror your design horizontally. This step is non-negotiable. Because you place the paper face-down on the shirt and flip it onto the fabric, anything you do not mirror comes out backwards — text especially. Most design software has a built-in flip or mirror option. In Microsoft Word or similar programs, our step-by-step guide on how to reverse print in Word walks through the exact settings to change.
Once your design is mirrored, set your printer to its highest quality setting and select the correct paper profile in your print driver if the option exists. Print a test copy on plain paper first to confirm sizing and placement before committing to the transfer sheet. After printing, let the sheet sit undisturbed for a few minutes before handling. Smudging wet ink by touching it too soon is one of the most avoidable mistakes in the entire process.
Pro tip: Hold your plain-paper test print up against the shirt in front of a window to check scale and position before you ever load the transfer sheet — it takes 30 seconds and saves you from wasting expensive paper on a size that is off.
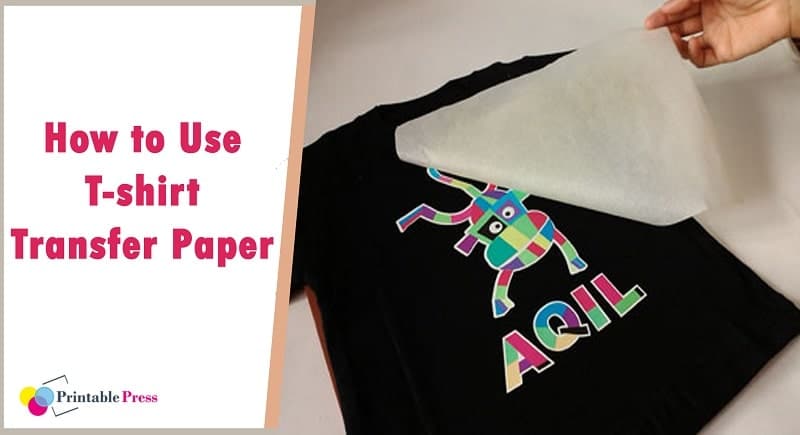
Pressing and Peeling for a Clean Result
Start by pre-pressing your shirt for about five seconds. This step removes any moisture or wrinkles from the fabric and creates a flat, even surface for the transfer to bond to. Moisture is the enemy here — even a slightly damp shirt causes bubbling or incomplete adhesion, and no amount of extra pressing time fixes it after the fact.
Position your design on the shirt, then cover it with a pressing cloth or a sheet of parchment paper to protect both the design and your iron's soleplate. Apply firm, even pressure for the time listed on your paper's packaging — typically 15 to 30 seconds for a household iron. Do not slide the iron back and forth. Hold it still and let the heat work evenly across the entire design.
When time is up, your peeling method depends on the paper type. Some papers peel hot, immediately after pressing. Others peel cold, after the sheet has cooled to room temperature. Using the wrong peel temperature is one of the most common reasons designs tear or lift at the edges. The packaging always specifies which method the paper requires — follow it exactly, every time. For the most consistent results across multiple shirts, a dedicated heat press delivers uniform pressure and precise temperature that a household iron simply cannot match. Our heat press guides cover the options at every budget.
Transfer Paper vs. Other Methods: The Real Trade-offs
Transfer paper is not the only way to get a custom design onto a shirt, and understanding its strengths and limitations helps you make the right call for each project you take on.
Where Transfer Paper Wins
Transfer paper is accessible, affordable, and requires almost no upfront investment beyond a printer and an iron or entry-level heat press. It is the best option for small batches, one-off custom pieces, and testing a design concept before committing to a larger production run. You can go from idea to finished shirt in under an hour, in any color combination, with photographic-quality detail that screen printing cannot match at small quantities. If you are just starting out, there is no faster or cheaper path to a wearable result.
It also integrates naturally with iron-on transfer paper workflows for projects that do not require professional equipment — making it genuinely home-friendly in a way that screen printing and sublimation setups are not.
Where Other Methods Have the Edge
For volume production, screen printing wins on cost per unit once you exceed around a dozen shirts. The setup cost is high, but the per-shirt cost drops dramatically at scale, and the durability is exceptional. Sublimation printing is another strong competitor — it produces permanently dyed fabric that never cracks, peels, or fades. The catch is that sublimation only works on polyester or polyester-coated substrates, which rules out most cotton shirts. If you want to explore that route, our guide on how to use sublimation paper covers the full process and explains exactly where it differs from heat transfer paper.
Mistakes That Ruin Your Transfer (and How to Avoid Them)
Most failed transfers come from a small set of repeatable errors. Knowing them in advance means you do not have to learn them the hard way on a shirt you care about.
The Most Common Errors
Forgetting to mirror the design is the most obvious mistake — and the most deflating, because you only notice it after the backing is already peeled. Always mirror before you print. Second on the list is pressing at the wrong temperature. Every paper type has a recommended heat range, and guessing rarely ends well. Use a laser thermometer to verify your iron's actual surface temperature if you are not getting consistent bonds.
Skipping the pre-press step is another frequent misstep. Even a small amount of moisture in the fabric disrupts the adhesive bond. Pre-pressing for five seconds before positioning your transfer costs almost nothing and noticeably improves adhesion. Finally, using light-fabric paper on a dark shirt — or dark-fabric paper when you wanted a borderless finish — produces results that look nothing like what you intended. The comparison table in the choosing section above is worth consulting before every new paper purchase.
When the Transfer Goes Wrong
If your design peels after washing, the most likely cause is insufficient heat or pressure during pressing, or a high-polyester fabric that did not bond properly in the first place. Once a transfer starts peeling, there is no reliable way to re-bond it — you are better off removing it cleanly and starting fresh. Our article on how to remove screen prints from shirts covers removal techniques that also apply to failed transfer paper adhesion. The more lasting fix, though, is always in the preparation: right paper, right temperature, right pressure, right peel method. Follow those four things and failures become rare.
Frequently Asked Questions
Can I use transfer paper with any printer?
No. You need to match the paper type to your printer. Inkjet transfer paper works only with inkjet printers, and laser transfer paper works only with laser printers. Using the wrong combination gives you poor ink absorption and a transfer that will not bond to fabric correctly.
Do I need a heat press, or can I use a household iron?
A household iron works for transfer paper, but results are less consistent because irons have uneven heat distribution and no pressure control. A heat press delivers uniform, repeatable pressure and exact temperature, which is especially important if you are pressing multiple shirts or working toward a production workflow.
Why did my design come out reversed?
You forgot to mirror the image before printing. Transfer paper requires a horizontally flipped design because you place it face-down on the fabric. Always enable the mirror or flip option in your design software or printer settings before sending the job to the printer.
How do I know whether to peel hot or cold?
Check your paper's packaging — it will specify. Some papers require immediate hot peeling right after pressing, while others need to cool completely before you lift the backing. Using the wrong method causes the design to tear or lift at the edges, so follow the manufacturer's instructions exactly every time.
Can I use transfer paper on dark-colored shirts?
Yes, but you need dark-fabric transfer paper specifically. Standard light-fabric paper is transparent and simply will not show up on dark garments. Dark-fabric paper has a white backing layer that makes your colors visible on black or deep-toned fabric, though it leaves a visible border around the design.
How many washes will a heat transfer paper design last?
With proper application, a quality transfer paper design typically lasts 25 to 50 washes before showing significant wear. Washing shirts inside out in cold water and air-drying them extends the lifespan considerably. Heat from a dryer is the primary cause of premature cracking and peeling.
What fabrics work best with transfer paper?
100% cotton is the most reliable fabric for heat transfer paper. Cotton-polyester blends also work, though adhesion varies with the polyester percentage. High-polyester fabrics are difficult because they resist bonding and can scorch at pressing temperatures. Always test on a scrap piece of the same fabric before pressing a finished shirt.
Can I reuse transfer paper after pressing?
No. Transfer paper is single-use. Once the design has been pressed onto the fabric, the adhesive coating is spent and the backing sheet cannot be used again. Always print a fresh sheet for each individual transfer.
Final Thoughts
Transfer paper is one of the most accessible ways to create custom shirts at home or in a small studio — and once you understand the process, clean results are well within reach. Pick the right paper for your printer and fabric color, mirror your design before printing, pre-press your shirt to remove moisture, and follow the peel instructions on the packaging to the letter. If you are ready to take your results to the next level, browse our heat press guides to find the right equipment for your setup — a dedicated press makes every transfer more consistent and gives you the confidence to press shirt after shirt without second-guessing the outcome.
 |  |  |  |

About Anthony Clark
Anthony Clark spent nine years running a custom printing studio in Phoenix, Arizona, producing sublimation-printed drinkware, heat-pressed apparel, and branded merchandise for sports leagues, small businesses, and online retailers. That hands-on production background means he has calibrated hundreds of heat press cycles, sourced sublimation blanks from over a dozen suppliers, and troubleshot every coating and color-shift problem that shows up when dye meets polyester. He left the shop floor in 2019 to write full-time about the techniques and equipment he used daily. At PrintablePress, he covers sublimation printing and heat press methods.


Get some FREE Gifts. Or latest free printing books here.
Disable Ad block to reveal all the secret. Once done, hit a button below
| | | |