Sublimation Printing for Beginners
by Anthony Clark · April 04, 2022
The global custom printing market surpassed $6 billion in annual revenue, and sublimation printing now accounts for one of its fastest-growing segments. For creators stepping into the sublimation printing world, the appeal is immediate: colors vivid enough to rival professional photography, durability that outlasts conventional transfers, and a workflow compact enough to run from a spare bedroom. This guide covers everything about sublimation printing for beginners from first principles — the chemistry, the gear, the techniques, and the care routines that deliver consistent results.

At its core, sublimation printing converts solid dye directly into gas — skipping the liquid phase entirely — using heat and pressure. That gas permeates the polymer fibers of the substrate, and when the press plate lifts, those dyes re-solidify inside the material rather than on top of it. That distinction matters enormously. A screen-printed shirt can crack and peel after dozens of washes. A sublimated shirt, pressed correctly, retains its color integrity for the life of the garment.
Understanding that chemistry is the foundation. Everything else — equipment choices, temperature settings, substrate selection — flows from it. The sections below build a complete picture of what beginners need to succeed.
Contents
Getting Started with Sublimation Printing for Beginners
The process sounds complex, but the actual workflow is straightforward once the right equipment is in place. A sublimation printer outputs a design onto special transfer paper using sublimation ink. A heat press then applies controlled heat — typically between 380°F and 400°F — and firm pressure for a set dwell time, converting the ink to gas and driving it into the substrate. Remove the paper, allow the piece to cool, and the image is permanently embedded inside the material.
What Substrates Work
This is where many beginners hit an early wall. Sublimation only bonds with polymer-coated surfaces or high-polyester fabrics. A 100% polyester white t-shirt is the gold standard. Cotton absorbs moisture differently and won't hold the dye — colors print dull and wash out within a few cycles. For hard goods like mugs, phone cases, and tiles, a polyester coating on the surface is required. Most "sublimation blanks" sold by reputable suppliers already carry this coating, but it's worth confirming before purchasing in bulk.
Dark fabrics present a separate challenge. Sublimation dye is translucent — it works like a color filter, not an opaque layer. On a dark background, colors won't appear at full vibrancy no matter how precise the press settings. White or very light-colored substrates are essential for accurate color reproduction. For dark-fabric applications, a comparison of screen printing vs sublimation makes it clear why sublimation isn't always the right tool for every job — and which alternatives serve those use cases better.
The Essential Equipment Every Beginner Needs
A complete entry-level sublimation setup requires four core components: a sublimation printer, sublimation ink, sublimation transfer paper, and a heat press. Optional but useful additions include heat-resistant tape, a Teflon sheet, and butcher paper for protecting the platen from ink bleed-through.
Choosing a Sublimation Printer
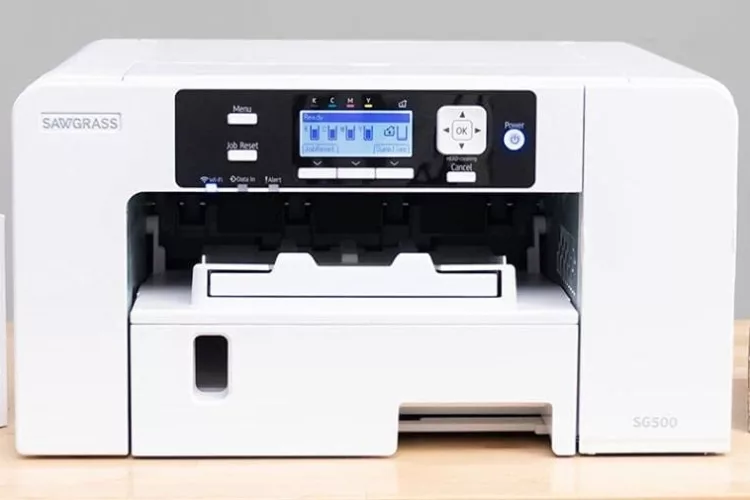
Two main paths exist for beginners. The first is a dedicated sublimation printer — models from Sawgrass (the SG500 and SG1000) come pre-loaded with sublimation ink and proprietary software designed for the workflow. The second path is converting a compatible Epson EcoTank or WorkForce model by replacing the standard ink with sublimation ink. Converted Epsons cost significantly less upfront, though they require more hands-on management and careful ink selection.
One critical point: once a printer is converted to sublimation ink, it cannot be used for standard printing. The inks are incompatible, and mixing them damages the print heads permanently. Beginners who want a clean, dedicated setup without conversion risk typically find Sawgrass hardware worth the premium. When comparing options, differences in ink formulation matter more than most beginners expect — the detailed breakdown of sublimation ink vs pigment ink explains why standard pigment cartridges won't produce proper sublimation results regardless of paper or press settings.
Sublimation Paper and Ink
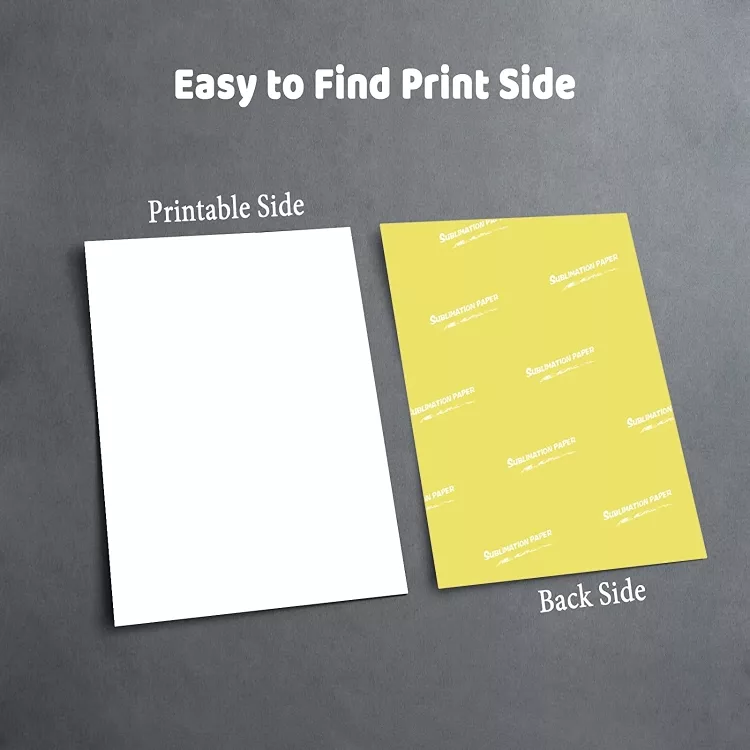
Not all sublimation paper is equal. Higher-release papers transfer more ink to the substrate, producing more saturated colors. Lower-release papers hold more ink back, resulting in softer output — which some operators prefer for apparel but which limits vibrancy on hard goods. The guide on sublimation paper vs transfer paper clarifies why these aren't interchangeable: transfer paper is designed for standard inkjet or laser output, while sublimation paper is formulated specifically for dye-gas transfer chemistry.
Paper weight also matters. Heavier stock (around 105gsm) resists moisture and buckling under press heat better than lighter alternatives, reducing ghosting — the faint double-image caused by paper shift during pressing. For a complete walkthrough of paper handling, the guide on how to use sublimation paper covers cutting, taping, and positioning in step-by-step detail.
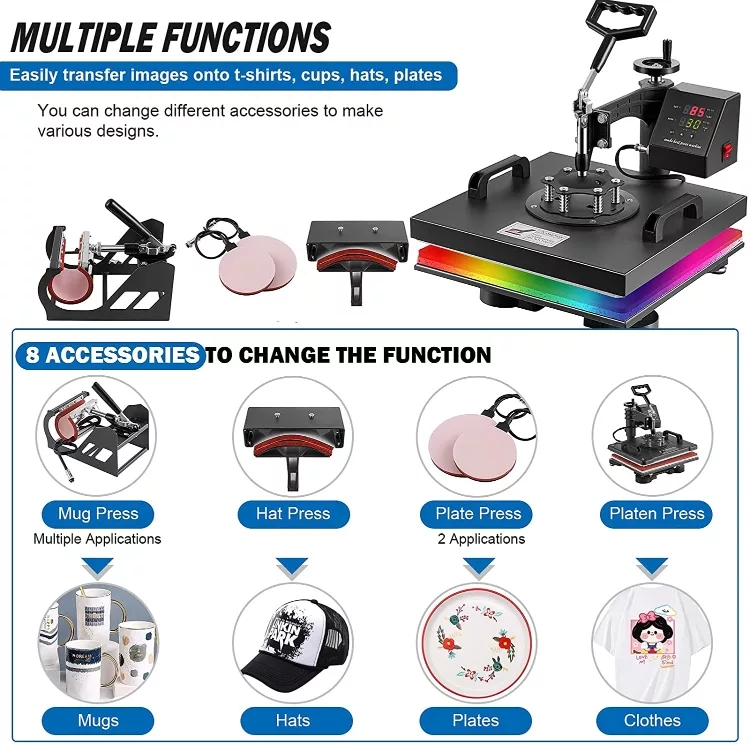
The Heat Press
The heat press is the heart of the operation, and beginners are right to prioritize it over cost-cutting here. Consumer-grade heat presses fall into three main categories: clamshell (lid opens upward), swing-away (lid swings to the side), and draw (substrate slides out like a drawer). For beginners, a 15×15-inch swing-away press offers the most flexibility: even heat distribution, safe working clearance, and enough platen space to handle standard apparel and most rigid substrates.
For specialty items like mugs, a flat press won't work — a dedicated mug press is required to wrap the cylindrical surface evenly. The available options for mug press machines vary widely in temperature accuracy and build quality, and buying the cheapest unit frequently leads to inconsistent heat distribution and wasted blanks.
Temperature accuracy is non-negotiable. A press that reads 400°F on its digital display but actually delivers 375°F or 420°F at the platen will produce either under-transferred washed-out prints or scorched substrates. An infrared thermometer — typically under $20 — verifies actual platen temperature and pays for itself on the first batch of avoided mistakes.
Sublimation vs Other Printing Methods
Choosing the right printing method depends on substrate type, order volume, budget, and durability requirements. The table below compares sublimation against the most common alternatives beginners consider when setting up a custom printing operation.
| Method | Best For | Fabric Requirement | Durability | Startup Cost |
|---|---|---|---|---|
| Sublimation | Polyester apparel, mugs, hard goods | 100% polyester or poly-coated surface | Excellent — dye embedded in substrate | Medium ($300–$900) |
| Heat Transfer Vinyl (HTV) | Simple text and graphics on any fabric | Any fabric | Good — can peel with heavy use | Low ($200–$500) |
| Screen Printing | High-volume runs, spot colors | Any fabric | Very Good | High ($500–$2,000+) |
| DTG (Direct to Garment) | Full-color designs on cotton | Prefers 100% cotton, pre-treatment required | Good with proper pre-treatment | Very High ($10,000+) |
| Heat Transfer Paper | Photos and detailed designs, low volume | Light or dark depending on paper type | Moderate — surface layer only | Low ($100–$300) |
Sublimation holds a unique position in this landscape: it is the only entry-level method where the colorant becomes part of the substrate itself rather than adhering to its surface. For anyone focusing on polyester apparel, performance wear, custom drinkware, or awards and recognition products, no other method at this price point matches it for durability and photographic-quality output.
Pro tip: When testing a new blank supplier, always press a sample piece first. Polyester content percentages vary more than labels suggest, and a quick test press reveals coating quality and true color vibrancy before committing to a large order.
Advantages and Limitations of Sublimation Printing
What Sublimation Does Best
The permanent bond between dye and substrate is the defining advantage. There is no surface layer to crack, peel, or wash away because the color exists inside the material. For proper care of finished goods, the guide on washing sublimation shirts recommends cold water and inside-out laundering to extend vibrancy even further — but the durability baseline is already substantially higher than surface-transfer methods.
Full-bleed, edge-to-edge printing is another major advantage. Screen printing and HTV require margins and setup costs for each new color layer. Sublimation handles photographic complexity — gradients, shadows, thousands of simultaneous colors — with no additional cost or setup time. One press, one sheet of paper, unlimited color depth. The per-unit economics also scale well: once equipment costs are recovered, consumable costs for a standard sublimated mug run under $2, and for a t-shirt, total consumable cost typically sits around $3–5 depending on the blank quality and ink coverage.
Where Sublimation Falls Short
The substrate limitation is real and non-negotiable. Cotton, linen, dark fabrics, and uncoated ceramics simply will not produce acceptable sublimation results. Beginners who want to print on 100% cotton t-shirts need to look at other methods. The guide on t-shirt heat printing basics covers the alternatives that work on natural fibers, including HTV and heat transfer paper approaches that don't require polyester content.
Color accuracy requires calibration. What appears on screen rarely matches the pressed output without ICC profiling, and beginners typically run a dozen test prints before dialing in their color settings. Using the printer manufacturer's ICC profile — a standardized color mapping file — dramatically shortens that calibration curve. Sublimation also requires mirrored images: because the paper is placed face-down on the substrate during pressing, any text or directional design must be printed in reverse. Most RIP software and design programs handle this automatically, but forgetting to flip the image is a classic beginner mistake that wastes a full sheet of paper and ink with every occurrence.
Proven Techniques for Sharper, Longer-Lasting Prints
Design Preparation
Start with a minimum resolution of 150 DPI at final print size — 200–300 DPI is better for hard goods where viewers examine the surface up close. Upscaling a 72 DPI web image to fill a 15-inch print panel produces visible pixelation after pressing. The investment in quality source files pays off across every single press run.
Color mode matters significantly. Work in RGB, not CMYK. Sublimation printers output in RGB color space, and designs prepared in CMYK often shift noticeably after conversion. The most vibrant reds, oranges, and electric blues achievable through sublimation come from pushing RGB values to their limits — something CMYK workflows naturally constrain. According to the Wikipedia overview of dye-sublimation printing, the process was first developed for industrial textile applications before consumer-grade equipment made it accessible to small businesses and home crafters — which explains why the reproducible color gamut is genuinely broader than most standard inkjet output.
Pressing Best Practices
Consistent results depend on three variables: temperature, time, and pressure. These are substrate-specific, and every blank supplier provides recommended press settings. Following those numbers exactly on the first press, then making small adjustments based on visual results, is the most efficient calibration approach. Guessing settings based on a different substrate leads to inconsistent batches and wasted materials.
Moisture is the most underestimated enemy of sublimation quality. Pressing a slightly damp garment traps steam under the substrate, creating white blotchy areas commonly called "gassing." Pre-pressing the blank for 5–10 seconds before applying the transfer sheet removes residual moisture and flattens the substrate for better paper contact. This single step eliminates a significant percentage of the defects beginners encounter in their first weeks.
Heat-resistant tape secures the paper and prevents ghosting. Even minor paper shift during the dwell time creates a faint second impression slightly offset from the main print. Taping all four corners is the minimum; taping the entire perimeter of the design is the professional standard. For substrates with surface irregularities like zipper pulls or thick seams, a silicone pressing pad placed underneath the garment equalizes pressure across the uneven surface and improves transfer uniformity.
Caring for Sublimated Products
Washing and Handling Apparel
Sublimated garments tolerate machine washing better than most decorated apparel, but a few consistent practices preserve long-term vibrancy. Washing inside out in cold or warm water — below 105°F — protects the outer surface from abrasion during the wash cycle. Avoiding high-heat dryer settings matters as well: while the dye itself is heat-stable, prolonged high heat degrades the polyester fibers, which causes the image to appear dull even when the dye hasn't actually faded. Line drying or tumble drying on low preserves both the garment and the print quality over time.
Bleach destroys sublimation prints entirely. Even color-safe bleach alternatives can strip vibrancy with repeated use. Gentle detergents without optical brighteners are the recommended choice — optical brighteners can affect white areas and light backgrounds over dozens of wash cycles, gradually shifting the overall color balance of the print.
Hard Goods Maintenance
For sublimated mugs, plates, and photo panels, the polyester coating that accepts the dye is the most vulnerable layer. Dishwasher use is technically possible for most sublimated hard goods, but hand washing extends the coating's functional life significantly. The thermal cycling of repeated dishwasher loads causes micro-expansion and contraction in the poly coating that gradually degrades its bond with the substrate over dozens of cycles. Hand washing in warm water with mild dish soap is the standard recommendation for maintaining hard goods long-term.
UV exposure fades sublimation prints faster than interior use, particularly for display items and drinkware used outdoors. Products displayed in direct sunlight show measurable color shift within months. For display pieces meant to last, UV-protective sealant sprays add a measurable layer of protection without affecting visual appearance or texture.
Printer Maintenance
The sublimation printer requires consistent attention to stay in peak condition. Sublimation ink settles in cartridges and print head nozzles during idle periods. Running a nozzle check and cleaning cycle every week the printer sits unused prevents clogging that eventually requires expensive purge cycles or full print head replacements. The cost of a weekly nozzle check — a small amount of ink — is trivial compared to the cost of a clogged head on a busy production day.
For extended idle periods of two weeks or more, printing a full-color test pattern cycles ink through all channels and prevents pigment settling in the nozzles. Leaving sublimation ink sitting in the system for months without use is the single most common cause of premature print head failure in converted Epson printers. Established maintenance habits in the first month of ownership prevent the majority of hardware problems beginners encounter later on.
Next Steps
- Choose a printer path — dedicated Sawgrass or converted Epson — and purchase only sublimation-compatible ink before pressing a single sheet. Confirm the specific model supports sublimation conversion before buying.
- Order a sample pack of sublimation blanks (at minimum: one white polyester t-shirt, one coated mug, one hard panel) and run test presses with the supplier's recommended temperature, time, and pressure settings to establish a calibration baseline.
- Verify heat press platen temperature with an infrared thermometer before the first production run, and adjust press settings if the actual temperature deviates more than 5°F from the target.
- Set up a weekly printer maintenance routine — nozzle check and cleaning cycle — and schedule it on a recurring calendar reminder so it becomes automatic rather than reactive.
- Review the full range of sublimation-compatible substrates available, then narrow focus to two or three product types to develop deep pressing expertise before expanding the product line.
 |  |  |  |

About Anthony Clark
Anthony Clark spent nine years running a custom printing studio in Phoenix, Arizona, producing sublimation-printed drinkware, heat-pressed apparel, and branded merchandise for sports leagues, small businesses, and online retailers. That hands-on production background means he has calibrated hundreds of heat press cycles, sourced sublimation blanks from over a dozen suppliers, and troubleshot every coating and color-shift problem that shows up when dye meets polyester. He left the shop floor in 2019 to write full-time about the techniques and equipment he used daily. At PrintablePress, he covers sublimation printing and heat press methods.


Get some FREE Gifts. Or latest free printing books here.
Disable Ad block to reveal all the secret. Once done, hit a button below
| | | |