DIY Screen Printing: Every Detail You Should Know
by Marcus Bell · March 28, 2022
What if everything you have heard about screen printing being too technical or too costly for home use turns out to be a misconception? The truth is that learning how to DIY screen print is far more accessible than most people assume — and when you follow a disciplined process, the results can rival professional output. Whether you are producing custom t-shirts, crafting limited-run merchandise, or decorating fabric for personal projects, the screen printing method delivers durability and vibrancy that few other home techniques can match. This guide covers every essential detail: materials, technique, common misconceptions, and the maintenance practices that protect your long-term investment.
Screen printing — also known as silk screening — works by pushing ink through a fine mesh screen onto a substrate using a squeegee. A stencil, produced through a photochemical process using light-sensitive emulsion, prevents ink from passing through in areas where the design should not appear. According to the Wikipedia entry on screen printing, the method has roots in early twentieth-century commercial textile production and remains the dominant technique for high-volume garment decoration worldwide.
Before you commit to supplies or reconfigure your workspace, it is worth understanding what the process genuinely demands. Screen printing rewards methodical preparation and consistency. A single misstep — an underexposed screen, poorly mixed ink, or improperly tensioned mesh — can compromise an entire print run. Once you internalize each stage, however, the workflow becomes precise and repeatable. That repeatability is what makes screen printing such a capable method, even at home or small-studio scale.
Contents
How to DIY Screen Print: A Step-by-Step Walkthrough
The core workflow of screen printing involves five stages: design preparation, screen coating, emulsion exposure, printing, and curing. Each stage builds directly on the one before it, and cutting corners at any point tends to produce visible problems downstream. The following breakdown guides you through each phase with the level of detail that makes a practical difference in your results.
Materials You Will Need
Your starter list does not need to be extensive. At minimum, you will need a screen — polyester mesh stretched over an aluminum or wood frame — photo emulsion with sensitizer, a squeegee, plastisol or water-based ink, a UV light source, and a substrate, most commonly a cotton t-shirt or similar fabric. You will also need a transparency printed in opaque black ink, a scoop coater, and a flat printing surface or platen to secure the substrate during the print stroke. For a detailed comparison of squeegee options organized by blade durometer and application type, the guide to the best screen printing squeegee covers the full range suited to different ink viscosities and mesh counts.
Preparing and Coating the Screen
Begin by degreasing the screen with a dedicated degreaser or a small amount of dish soap, then rinse thoroughly and allow it to dry completely. Any oil or residue on the mesh causes emulsion to adhere unevenly, producing pinholes or weak stencil areas. Once dry, mix your emulsion according to the manufacturer's instructions — most diazo emulsions require adding a sensitizer to the base — then coat both sides of the screen with a scoop coater in a single, smooth pass. Work in subdued or yellow-safelight conditions throughout, as photo emulsion begins hardening the moment it contacts UV light. After coating, dry the screen horizontally in a dark, temperature-controlled environment.
Exposing and Washing the Screen
Place your printed transparency on the coated, dried screen emulsion-side down, then expose it to a UV light source for the manufacturer-recommended duration. Exposure time varies based on the light source's wattage, the emulsion brand, and the screen's mesh count. Under-exposure leaves soft emulsion in areas that should block ink; over-exposure hardens emulsion where the design should open, destroying fine detail. After exposure, rinse with lukewarm water until the unexposed emulsion washes away cleanly and your design appears fully open. Hold the screen up to a light source and inspect for pinholes. Block any you find with a small dab of emulsion or screen filler before proceeding to the press.
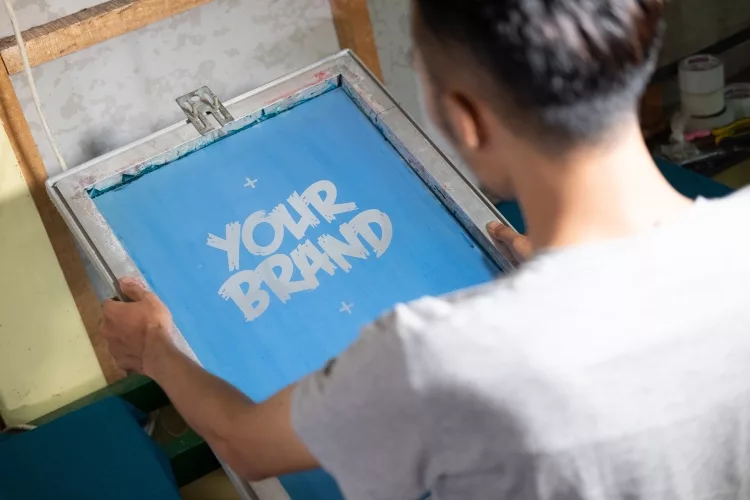
Printing and Curing Your Design
Position your substrate on a flat printing surface and secure it with adhesive spray or a platen. Place the screen over the design area, apply a line of ink above the image, and pull the ink across the screen in one firm, even stroke at a forty-five-degree angle. Lift the screen slowly to reveal the print beneath. Between pulls, flood the screen with a thin layer of ink to keep the mesh from drying out mid-run. Once printing is complete, cure the ink with a flash dryer, heat gun, or conveyor dryer — plastisol requires a full cure at approximately 320°F (160°C). Under-cured ink will crack and wash out after the first laundering. For broader context on machine-based garment decoration options, the best t-shirt printing machine reviews offer useful comparative perspective on what is available at different price points.
Misconceptions That May Be Holding You Back
Several persistent myths discourage people from attempting screen printing at home. Addressing these misconceptions directly can save you considerable time, money, and frustration before you ever coat your first screen.
You Need Professional Equipment for Serious Results
Many accomplished home printers begin with a single-color frame, a DIY light-box exposure setup, and a standard heat gun for curing — a total investment that can be quite modest. As your print volume and design complexity grow, you can scale incrementally by adding a registration system, a flash dryer, or additional screens rather than purchasing industrial equipment from the outset. What separates adequate results from excellent ones in the early stages is your understanding of the process, not the cost of your tools. Patience and careful technique outperform expensive hardware in nearly every beginner scenario.
One Ink Type Is Suitable for Every Project
The ink-type debate frequently produces strong preferences, but neither plastisol nor water-based ink is universally superior. Plastisol sits on top of the fabric, producing vibrant, highly opaque color with a slightly raised feel — ideal for bold graphics on heavy cotton. Water-based ink penetrates the fiber and produces a softer hand, which suits fashion-oriented garments but requires more careful management of open time and ambient humidity. Your choice should depend on the substrate, the desired print feel, and your production environment. For insight into how opacity challenges appear across different decoration methods, the article on applying white HTV on dark shirts covers contrast strategies that directly inform ink selection for dark-ground screen printing.
Weighing the Advantages and Limitations of Home Screen Printing
Like any production method, DIY screen printing carries genuine strengths alongside real constraints. Understanding both sides before you invest allows you to match the technique to your actual workflow and creative goals.
Where Screen Printing Excels
Screen printing produces high-opacity prints on fabric that withstand repeated laundering without significant fading or cracking. The per-unit cost drops sharply as you print more pieces from a single screen, making it highly efficient for runs of twelve or more identical items. The technique also supports specialty inks — metallics, puff formulas, and discharge inks — that digital and transfer methods cannot replicate. If you work across multiple fabric types including stretch or athletic materials, reviewing stretch HTV versus regular HTV for athletic wear can help you identify when screen printing is the stronger choice and when a transfer-based alternative is more practical.
Where the Method Presents Challenges
Screen printing's limitations become most apparent when designs include photographic gradients, many colors, or very fine halftone detail. Each color in a multicolor design requires a separate screen and a separate print pass, making complex artwork significantly more labor-intensive to set up. Low-run orders — a single shirt or a one-time design — rarely justify the setup time and material cost. In those cases, alternative decoration methods typically offer a better return. If you decorate specialty substrates such as canvas, the guide on applying vinyl to canvas tote bags illustrates how complementary techniques can meaningfully expand your overall decorating capability.
| Factor | Screen Printing | Heat Transfer (HTV / DTF) |
|---|---|---|
| Per-unit cost at scale | Low | Moderate to high |
| Per-unit cost for short runs | High (setup cost amortized) | Low |
| Color complexity | Limited — one screen per color | Unlimited |
| Print durability | Excellent (100+ wash cycles) | Good (50–80 wash cycles) |
| Print feel | Raised (plastisol) or soft (water-based) | Thin film layer on surface |
| Setup time | Significant | Minimal |
| Specialty ink options | Wide — puff, metallic, discharge | Limited |
| Ideal application | Bulk runs, bold single-color graphics | Short runs, photographic designs |
Techniques That Elevate Your Output
Once you are comfortable with the fundamentals of how to DIY screen print, a set of more refined techniques can meaningfully improve your results. These are the details that distinguish adequate prints from work you would confidently present as professional quality.
Matching Mesh Count to Your Design and Ink
Mesh count — the number of threads per inch woven into the screen — directly determines how much ink passes through and how much detail the screen can hold. Lower mesh counts in the range of 110 to 160 deposit heavier ink layers and suit bold opaque graphics or underbase layers on dark fabrics. Higher mesh counts in the 200 to 305 range retain finer detail and work well with halftone images and lower-viscosity water-based inks. Mismatching mesh count to ink viscosity produces either starved prints, where too little ink passes through, or flooded prints, where excess ink bleeds beyond the design edge. Test your specific combination on scrap material before committing to a full production run.
Achieving Accurate Registration in Multi-Color Work
Accurate registration — aligning each successive color pass precisely to the one before it — is among the most technically demanding aspects of screen printing. Even a fraction of a millimeter of misalignment becomes clearly visible in the finished print, particularly on text and geometric forms. A registration system using pins and tabs eliminates most of this variability for multi-color designs. Mark your platen with tape guides and verify alignment on newsprint before printing on actual substrates. If you have experience with vinyl-based stencil work, the techniques described in how to make vinyl stencils for painting share relevant registration principles that apply directly to multi-color screen setups.
Exploring Specialty Inks and Surface Effects
Screen printing supports a range of specialty ink formulas that add tactile and visual dimension to the finished print. Puff inks expand under heat to create a raised, three-dimensional surface texture. Metallic inks incorporate fine reflective particles for a luminous finish. Discharge inks strip dye from the base fabric rather than sitting on top of it, producing an exceptionally soft hand and a vintage appearance well-suited to fashion garments. If you want to explore complementary surface effects beyond ink formulas alone, understanding materials such as flock vinyl — which produces a velvet-like raised texture — can inform how you combine decoration methods across different design elements on the same garment.
Keeping Your Screen Printing Equipment in Top Condition
Your screens, squeegees, and printing surfaces represent a meaningful long-term investment. How you care for them between sessions determines both the quality of your next print run and the working lifespan of each piece of equipment. Consistent maintenance requires modest time but pays dividends across hundreds of future impressions.
Cleaning Screens After Every Session
Remove residual ink from the screen immediately after each print session using the appropriate solvent — mineral spirits or ink degrader for plastisol, water or a dedicated water-based screen wash for water-based inks. Do not allow plastisol ink to cure on the mesh; once hardened, it becomes extremely difficult to remove without damaging the emulsion or the frame. After clearing the ink, apply emulsion remover and rinse thoroughly to reclaim the mesh for future use. Inspect the mesh for tears or areas of sagging tension — a compromised screen produces inconsistent ink deposit and should be replaced rather than used on a paid production job where quality expectations are high.
Caring for Squeegees and Hardware
Squeegee blades dull and deform over time. A rounded or nicked blade deposits ink unevenly across the substrate, often producing light-coverage streaks or visible pressure lines in the finished print. After each session, clean the blade with the appropriate solvent and store squeegees flat or suspended — never resting on the blade edge, which accelerates deformation. Inspect each blade by holding it up to a light source and looking for nicks, warps, or soft areas along its length. A sharpening tool can restore a mildly rounded edge, but heavily degraded blades should be replaced without hesitation. The best screen printing squeegee guide provides a practical framework for evaluating replacements by durometer rating, blade width, and handle construction.
Long-Term Screen Storage
Reclaimed screens — those with emulsion fully removed and mesh intact — should be stored clean, dry, and away from UV light. Even indirect indoor light can degrade freshly coated emulsion before it reaches the exposure stage. Store coated screens vertically in a light-proof cabinet or cover them with a dark cloth until use. Label each reclaimed screen with its mesh count and the most recent design it carried, especially if you maintain a library of screens for recurring print jobs. This simple practice prevents mix-ups during setup and helps you track which screens require re-tensioning or replacement after repeated use.
Frequently Asked Questions
What materials do I need to start screen printing at home?
At minimum, you will need a mesh screen on a frame, photo emulsion with sensitizer, a squeegee, plastisol or water-based ink, a UV light source, and a substrate. A scoop coater, printed transparency film, and a flat printing surface or platen round out a fully functional starter setup without requiring significant capital investment.
Can I expose a screen without a professional exposure unit?
Yes. A DIY light box — a glass-topped wooden frame with fluorescent UV bulbs underneath — is a common and effective approach. Direct sunlight can also work, though exposure times are less predictable and weather-dependent. The key in either case is a consistent, even UV source that illuminates the entire screen surface uniformly.
What is the difference between plastisol and water-based screen printing ink?
Plastisol ink sits on top of the fabric, producing opaque, vibrant color with a slightly raised feel. It does not dry on the screen, making it forgiving for longer print runs. Water-based ink penetrates the fiber and produces a softer hand that suits fashion-oriented garments, but it requires careful attention to open time to prevent premature drying in the mesh.
How many uses can I get from a single screen?
A well-maintained screen can support dozens to hundreds of print sessions before the mesh requires replacement. Emulsion degrades over time with repeated reclaiming, but the mesh itself has a significantly longer service life. Proper cleaning after each use, careful storage, and avoiding excessive squeegee pressure are the primary factors that determine longevity.
Can I screen print on dark-colored fabrics?
Yes, though printing on dark fabrics typically requires an opaque white underbase layer printed and flash-cured first. The colored inks are then printed on top of the underbase, which prevents the dark substrate from muting or shifting the design colors. This adds a step to the workflow but produces vivid, accurate color reproduction on any dark ground.
What mesh count should I use for a typical t-shirt design?
For most solid-color t-shirt graphics with moderate detail, a 160-mesh screen is a reliable starting point. It deposits a sufficient ink layer for strong opacity without sacrificing too much edge definition. Finer halftone or photographic work generally requires 200-mesh or higher, while specialty effects that need heavy ink deposit often perform better on a 110-mesh screen.
How do I prevent ink from drying in the screen during a print run?
Flood the screen between each pull by drawing a thin layer of ink across the mesh without applying printing pressure. This keeps the ink in the open stencil areas from contacting air and drying prematurely. Maintaining a stable, moderate workspace temperature also helps — cool environments thicken plastisol while warm, dry conditions accelerate water-based ink evaporation.
Is screen printing more economical than heat transfer vinyl for t-shirts?
Screen printing becomes more economical at higher print quantities. Setup costs are fixed per design, so the per-unit cost decreases as you produce more pieces from a single screen. Heat transfer vinyl carries minimal setup cost, making it the more economical choice for short or one-off runs. For a detailed method comparison in athletic and stretch-fabric contexts, the guide on stretch HTV versus regular HTV for athletic wear provides relevant cost and performance context.
Mastery of how to DIY screen print belongs to those who respect the process enough to understand every variable — because in screen printing, consistent results are never accidental.
 |  |  |  |
About Marcus Bell
Marcus Bell spent six years as a production manager at a small-batch screen printing shop in Austin, Texas, overseeing everything from film output and emulsion coating to press registration, squeegee selection, and garment finishing. He expanded into vinyl cutting and Cricut projects when the shop added a custom apparel decoration line, giving him direct experience with heat transfer vinyl application, weeding techniques, and the real-world differences between Cricut, Silhouette, and Brother cutting machines. At PrintablePress, he covers screen printing, vinyl cutting and Cricut projects, and T-shirt printing and decoration techniques.


Get some FREE Gifts. Or latest free printing books here.
Disable Ad block to reveal all the secret. Once done, hit a button below
| | | |