How to Connect a Printer to Mac
by Karen Jones · March 30, 2022
Connecting a printer to your Mac takes about two minutes — plug in a USB cable or put both devices on the same Wi-Fi network, and macOS detects your printer automatically. Whether you're new to printing or just switching to a Mac, our printer guides have you covered from setup to specialty printing techniques.

macOS has included built-in printer support for years through a framework called CUPS, meaning your Mac already speaks your printer's language before you even open a settings menu. Most modern printers connect without hunting down driver files or running third-party installers. That said, there are a few scenarios — a stubborn network printer at the office, an older model that needs a manual driver, or a wireless setup that refuses to cooperate — where knowing the details makes all the difference.
This guide walks you through every method for how to connect a printer to Mac, covers common real-world setups, and gives you practical troubleshooting advice so you're not left guessing when something goes sideways.
Contents
How macOS Manages Printer Connections
The CUPS Framework
macOS uses CUPS (Common Unix Printing System) as its core print engine. CUPS is open-source software that sits between your Mac and your printer, managing job queuing, driver translation, and communication protocols. It's the reason macOS supports such a wide variety of hardware without requiring a separate installer from every manufacturer. When you add a printer in System Settings, you're registering it with CUPS — connection type, driver, and default settings all get stored so your Mac remembers it going forward.
Understanding this matters when things go wrong. If your printer disappears from the list after a macOS update, CUPS still has the configuration — you may just need to re-add the printer using the same steps you used originally. No need to reinstall anything from scratch.
AirPrint: Apple's Wireless Printing Standard
AirPrint is Apple's built-in wireless printing protocol, and if your printer supports it, the setup is almost entirely automatic — no drivers to download, no configuration pages. Hundreds of printers from HP, Epson, Canon, and Brother support AirPrint. The moment an AirPrint printer joins your Wi-Fi network, it shows up in your Mac's printer list, ready to use.
Pro tip: If you're buying a new printer specifically for Mac use, prioritize AirPrint compatibility — it eliminates driver issues entirely and keeps you protected against compatibility breaks when macOS updates.
What You Need Before Connecting
Hardware and Connectivity Requirements
Getting your hardware in order before you start saves you from stopping halfway through setup. Here's what you need depending on your connection method:
- USB connection: A USB cable that fits both your Mac and your printer. Most printers use USB-A to USB-B. Newer Macs with only USB-C ports need a USB-C hub or adapter.
- Wi-Fi connection: Your printer and Mac must be on the same wireless network. If your home or office uses separate VLANs for different devices, they need to be on the same one.
- Power and paper: Your printer needs to be on and loaded before macOS can detect it.
- Ink levels: A printer with critically low ink can fail during setup or produce errors. Before you begin, check your ink levels to avoid interruptions mid-process.
Drivers and Software Considerations
For AirPrint-compatible printers, macOS downloads the right driver automatically from Apple's database. For older or specialty printers, you may need to grab a driver from the manufacturer's website first. The table below shows what to expect for each connection type:
| Connection Type | Driver Required? | Setup Difficulty | Best For |
|---|---|---|---|
| USB (AirPrint printer) | No — automatic | Very easy | Home or dedicated workstation |
| Wi-Fi (AirPrint printer) | No — automatic | Easy | Shared household or office |
| Wi-Fi (non-AirPrint) | Sometimes | Moderate | Older printers, specialty models |
| Network / IP address | Sometimes | Moderate | Business network printers |
| Bluetooth | Rarely | Easy | Portable label and photo printers |
How to Connect a Printer to Mac — Step-by-Step
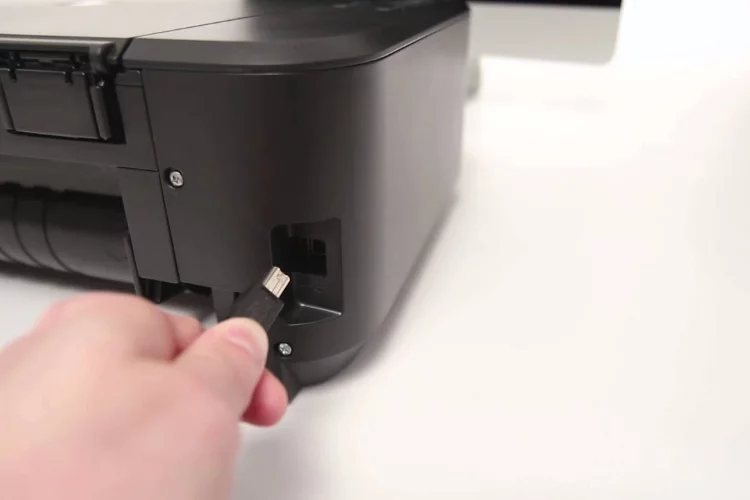
Connecting via USB
USB is the most reliable connection method. There's no network dependency, no signal issues, and the connection is instant. It's the best choice for a dedicated printing workstation or any setup where the printer stays in one place.
- Power on your printer and make sure it's loaded with paper and ink.
- Connect the USB cable from the printer to your Mac. Use a hub or adapter if your Mac only has USB-C ports.
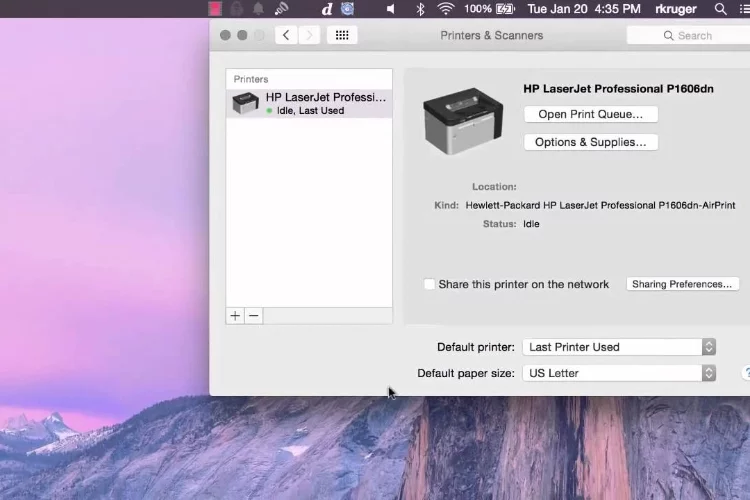
- Open System Settings from the Apple menu or your Dock.
- Click Printers & Scanners in the sidebar.
- macOS usually detects and adds the printer automatically. If it doesn't, click the + button to add it manually.
- Select your printer from the list and click Add.
- macOS downloads and installs the driver — this typically takes under a minute.
Connecting via Wi-Fi
Wireless is the better choice for shared printers or when your Mac is a laptop. Once the printer is on your network, every Mac in the house can use it without running any cables.
- Connect your printer to Wi-Fi using its built-in display or control panel — you'll need your Wi-Fi password. Many printers also support WPS: press the WPS button on your router and the Wi-Fi button on your printer simultaneously.
- Make sure your Mac is on the same Wi-Fi network as the printer.
- Open System Settings → Printers & Scanners.
- Click the + button to add a printer.
- Your printer appears in the list. Select it and click Add.
- macOS installs the driver automatically and your printer is ready to use.
Common Printer Setup Scenarios
Connecting to a Shared Network Printer
In offices and multi-user households, printers are often shared across a network. If another Mac is sharing a printer, you connect to it through the "Windows" tab in the Add Printer window — even if neither machine runs Windows. This uses the SMB protocol. You'll need the host Mac's name or IP address, plus any network credentials required to access it.
If the printer is connected directly to a router (rather than a computer), it shows up as a standalone network device. In that case, add it using its IP address — covered in the next section.
Adding a Printer by IP Address
When your printer doesn't appear automatically in the list, you can add it manually using its IP address. This is common for business-grade printers on larger networks.
- Find your printer's IP address on its built-in display, or print a network configuration page (most printers have this in their settings menu).
- In System Settings → Printers & Scanners, click + and then the IP tab.
- Enter the printer's IP address. macOS attempts to identify the printer and select the right driver automatically.
- If macOS can't find a driver, select one manually from the list or download one from the manufacturer.
This approach is especially useful if you're wondering how inkjet printers work on a network — their communication protocols are the same whether they're connected via USB or IP.
Troubleshooting and Pro Tips
Printer Not Showing Up in macOS
If your printer doesn't appear in the Printers & Scanners list, work through these steps in order:
- Check physical connections. For USB, try a different port or cable. For Wi-Fi, confirm the printer is connected — most print a wireless status page from their menu.
- Verify the same network. Your Mac and printer must be on the same SSID. Guest networks often block device-to-device communication.
- Restart the printer. Power cycle completely — hold the power button until it fully shuts off, wait 30 seconds, and power back on.
- Reset the printing system. In Printers & Scanners, right-click anywhere in the printer list and choose "Reset printing system." This removes all printers and clears CUPS — then re-add your printer fresh.
- Update macOS. Pending system updates sometimes include updated printer drivers.
Warning: "Reset printing system" removes every printer you've added — you'll need to reconnect them all, so only use this as a last resort when individual printer fixes haven't worked.
Print Jobs Stuck in the Queue
A stuck print queue is frustrating, but the fix is usually quick. Open the printer from your Dock or Printers & Scanners, delete all pending jobs, and try printing again. If jobs keep getting stuck, the printer driver may be corrupted — remove the printer, re-add it, and macOS downloads a clean driver. Keeping your printer clean also reduces paper jams that cause queue errors; see how to clean a printer for a full maintenance walkthrough.
What to Do After Your Printer Is Connected
Set Your Default Printer
If you have multiple printers connected to your Mac, macOS uses whichever one you last printed to as the default — unless you specify otherwise. To lock in a specific printer as the permanent default, go to System Settings → Printers & Scanners → Default Printer and select the one you want. This saves you from manually selecting a printer every time you hit Print. For a deeper look at managing multiple printers, read how to change your default printer for Mac and Windows options.
Once your default is set, it's worth thinking about long-term maintenance. Knowing how long printers last and how long printer ink lasts helps you plan replacements and avoid unexpected downtime during a big print job.
Printing Photos and Specialty Media
With your printer connected, you're ready for more than standard documents. macOS's print dialog gives you precise control over paper size, print quality, and color profiles — all of which matter when you're working with specialty media. For projects like crafting printables or home decor prints, printing on photo paper requires selecting the right paper type in both macOS's print dialog and your printer's own settings to get accurate color rendering.
If you're using your Mac-connected printer for labels, transfers, or crafting projects, the same setup process applies — the difference is in the media settings you choose at print time, not in the connection itself.
Frequently Asked Questions
Why won't my Mac recognize my printer even after connecting via USB?
The most common causes are a faulty cable, a USB port issue, or a missing driver. Try a different USB cable and port first. If the printer still doesn't appear in Printers & Scanners, visit the manufacturer's website and download the latest Mac driver manually, then re-add the printer.
Do I need to install software to connect a printer to my Mac?
For most modern printers — especially AirPrint-compatible models — no additional software is required. macOS downloads drivers automatically from Apple's database. For older or specialty printers, you may need to install a driver from the manufacturer's site before adding the printer in System Settings.
Can I connect a printer to my Mac without Wi-Fi?
Absolutely. A USB connection works completely independently of your Wi-Fi network. Simply plug the printer into your Mac with the appropriate USB cable, and macOS handles the rest. Bluetooth is another offline option for supported portable printers.
How do I connect a printer to my Mac on a corporate network?
On a managed corporate network, you'll typically need to add the printer using its IP address through the IP tab in the Add Printer window. Your IT department can provide the printer's IP address and any credentials required. Some networks also use print servers — your IT team will guide you through those specifics.
My printer appears in the list but prints a blank page. What's wrong?
A blank page usually means the driver is mismatched or the print settings are incorrect. Remove the printer, reset the printing system, and re-add it so macOS downloads a fresh driver. Also confirm you've selected the correct paper type and print quality in the print dialog — wrong settings can cause output that looks blank on certain media.
Can I use one printer with multiple Macs?
Yes. A Wi-Fi or AirPrint printer connects to as many Macs as you want simultaneously — each Mac just needs to add it through Printers & Scanners. For a USB printer, you can share it from one Mac to others through System Settings → Printers & Scanners → check "Share this printer on the network."
How do I reconnect my printer after a macOS update?
After a major macOS update, your printer may be gone from the list. Go to System Settings → Printers & Scanners and click + to re-add it. macOS usually finds it automatically and downloads updated drivers. If not, a reset of the printing system followed by a fresh add almost always resolves post-update issues.
Is Bluetooth a reliable way to connect a printer to a Mac?
Bluetooth works well for portable label printers and compact photo printers designed for it, but it's slower and has a shorter range than Wi-Fi. For high-volume printing or full-size desktop printers, stick with USB or Wi-Fi. Bluetooth is best reserved for mobile setups where neither cable nor Wi-Fi is practical.
Next Steps
- Open System Settings → Printers & Scanners right now and confirm your printer is listed and set as the default — don't wait until you're mid-project to discover it's missing.
- Print a test page to verify your connection is solid and the driver is working correctly before you tackle any real print job.
- Check your ink levels and schedule a printhead cleaning if your last prints looked streaky — visit how to clean a printer for a step-by-step maintenance routine.
- If you share your workspace with others, share your printer through System Settings so everyone on the network can use it without repeating the setup process.
- Explore specialty printing options like photo paper or transfer paper now that your Mac is connected — start with printing on photo paper to get a feel for how media settings work in the print dialog.
 |  |  |  |

About Karen Jones
Karen Jones spent seven years as an office manager at a mid-sized financial services firm in Atlanta, where she was responsible for a fleet of more than forty inkjet and laser printers spread across three floors, managed ink and toner procurement contracts, and handled first-line troubleshooting for connectivity failures, paper jams, and driver conflicts before escalating to IT. That daily exposure to printers from Canon, Epson, HP, and Brother under real office conditions gave her a practical command of setup, maintenance, and common failure modes that spec sheets never capture. At PrintablePress, she covers printer how-to guides, setup and troubleshooting tips, and practical advice for home and office printer users.


Get some FREE Gifts. Or latest free printing books here.
Disable Ad block to reveal all the secret. Once done, hit a button below
| | | |