Measuring Thickness of Paper
by Karen Jones · April 03, 2022
Ever wondered why your printer keeps jamming, or why your heat transfers come out uneven no matter what you do? How to measure paper thickness is a skill most crafters and print enthusiasts skip — yet it directly affects print quality, feed reliability, and finished project results. The short answer: you need a micrometer or digital caliper, and a working knowledge of GSM versus caliper measurements. For anyone serious about printing, this knowledge is non-negotiable. Whether you're running sublimation transfers, laminating documents, or just trying to get clean output, thickness is the variable you're probably ignoring. If you're still sorting out the basics of feeding paper without errors, our guide on how to load paper in a printer is a great starting point — then come back here to master the thickness side of things.
Paper thickness is expressed two ways: GSM (grams per square meter), which reflects weight, and caliper, which is the actual physical thickness — measured in thousandths of an inch (mils) or millimeters. A higher GSM generally signals a thicker sheet, but that rule breaks down with coated papers, which can be heavy without being particularly thick. A direct caliper reading cuts through the confusion and gives you a precise, reproducible number every time.
According to Wikipedia's overview of paper, commercial printing expresses thickness in micrometers (µm) or points, while crafters and home users typically work in millimeters or mils. Getting comfortable with both units — and the tools that produce them — gives you a real advantage on every printing and crafting project you run.
Contents
- The Right Instruments for Measuring Paper Thickness
- When Paper Thickness Matters — And When It Doesn't
- How to Measure Paper Thickness: A Step-by-Step Walkthrough
- Smart Tips for Getting Accurate Readings
- Choosing the Right Paper Using Thickness Data
- Keeping Your Measuring Tools Accurate Over Time
- Frequently Asked Questions
- Key Takeaways
The Right Instruments for Measuring Paper Thickness
You don't need a lab to get accurate paper measurements. But you do need the right tool for the job. Here's what's available and when to use each one.
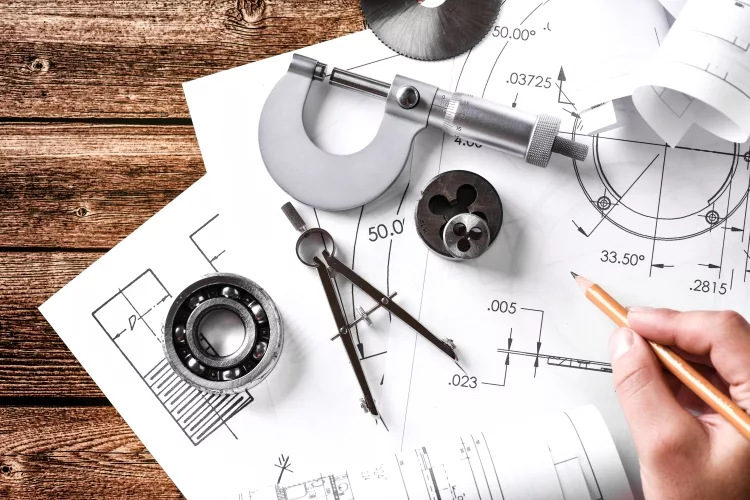
Micrometers: The Most Accurate Option
A micrometer (also called a screw gauge) is the professional's choice for paper thickness measurement. It works by clamping the paper between two flat anvils and reading the distance between them on a calibrated scale.
- Reads in increments as small as 0.001 mm (1 micrometer)
- Digital models display readings instantly — no squinting at analog scales
- Best for production environments where consistency is critical
- Price range: $15–$80 for a reliable digital model
- Look for a model with a ratchet stop — it applies consistent closing pressure so you don't compress the paper differently each time
Digital Calipers
Digital calipers are the most versatile tool in any crafter's drawer. While not as precise as a dedicated micrometer, they're accurate enough for almost every printing and crafting application.
- Typical resolution: 0.01 mm (10 micrometers)
- Can measure thickness, width, and depth — one tool for multiple tasks
- Affordable: a solid digital caliper runs $10–$30
- Switch between inch and millimeter modes at a button press
Pro tip: Always stack 10 sheets of paper and divide by 10 when using calipers — it eliminates the small closing-pressure variations that throw off single-sheet readings.
Paper Thickness Gauges and Budget Alternatives
Dedicated paper thickness gauges are designed specifically for sheet measurement. They apply a fixed, standardized pressure — removing operator error from the equation. These are common in print shops and binderies.
If you're on a tight budget, a feeler gauge set (the kind used for engine valve clearances) works in a pinch. The individual blades are precisely ground to thickness and can confirm whether a sheet falls within a target range, even if they can't give you a continuous reading.
When Paper Thickness Matters — And When It Doesn't
Situations Where You Must Measure
In these scenarios, guessing will cost you time and materials:
- Printer media limits: Every printer has a maximum sheet thickness (listed in the manual as media weight or caliper). Exceed it and you'll get jams, roller damage, or sensor errors.
- Sublimation transfers: Sublimation paper thickness affects ink release and transfer pressure. Wrong thickness means muddy colors or incomplete transfer. Check our full guide on how to use sublimation paper for the complete picture.
- Heat press work: Pressure settings are calibrated for specific material thicknesses. Off by too much and you get scorching or incomplete bonding.
- Laminating: Laminators have pouch thickness limits. Too thick and the rollers won't close properly — too thin and the film won't adhere cleanly.
- Vinyl cutting: Blade depth on a Cricut or other cutter is set based on material thickness. Measure first, set depth second.
When Estimating Is Good Enough
You don't always need to break out the micrometer. In these situations, GSM from the packaging is sufficient:
- Standard office printing on 75–90 GSM copy paper
- Simple cardstock crafts where exact caliper doesn't affect the outcome
- Test prints where you're evaluating color rather than mechanical fit
- Any time you're using the same paper stock you've successfully used before
How to Measure Paper Thickness: A Step-by-Step Walkthrough
Ready to get an accurate reading? Follow these steps and you'll have a reliable measurement in under two minutes.
Preparing Your Tools and Paper
- Condition your paper. Let paper sit in the room for at least 30 minutes before measuring. Temperature and humidity change paper dimensions — a sheet fresh from a cold storage room reads thicker than the same sheet at room temperature.
- Clean your instrument's contact surfaces. Wipe the anvils or jaws with a lint-free cloth. Even a speck of dust adds error to your reading.
- Zero your instrument. Close the micrometer or caliper without any paper and check that it reads 0.00. If it doesn't, use the zero/calibrate function before proceeding.
- Stack your sheets. Pull 10 identical sheets from the middle of the ream — not the top or bottom, where humidity exposure differs.
Taking a Reliable Measurement
- Position the stack. Place your 10 sheets flat between the measuring faces, centered, with no folds or curl at the contact point.
- Apply consistent pressure. Use the ratchet stop (micrometers) or close the jaws just until you feel resistance — not clamped tight. Over-squeezing compresses the paper fibers and gives a falsely low reading.
- Read the display. Note the measurement to two decimal places in millimeters.
- Divide by 10. That's your single-sheet caliper. For example: 1.20 mm ÷ 10 = 0.12 mm per sheet.
- Repeat three times. Take three readings at different spots on the stack. Average them. This corrects for any uneven thickness across the sheet.
- Record your result. Write down the GSM (from the package) and your measured caliper together. You now have a complete thickness profile for that paper.
Warning: High humidity causes paper to absorb moisture and swell — measurements taken on a damp day can read 5–8% thicker than the same paper measured in dry conditions. Always note environmental conditions when precision matters.
Smart Tips for Getting Accurate Readings
Common Measurement Mistakes
Even with the right tool, small errors creep in. Here's what to watch for:
- Measuring a single sheet: One sheet magnifies every small variation in caliper closing pressure. Always measure a stack and divide.
- Using the wrong part of the caliper: The flat jaws are for thickness. The stepped jaws are for inside dimensions. Use the flat faces only.
- Ignoring curl and cockle: Wavy or curled paper gives inconsistent readings. Flatten sheets under a heavy book for 10 minutes before measuring.
- Skipping the zero check: Worn or dirty instruments drift. Zero your tool before every session — not just at the start of a project.
- Measuring at the sheet edge: Edges are often trimmed or slightly compressed. Measure in the center third of the sheet for representative results.
Tricks for Consistent Results
- Keep a measurement log. Record paper brand, GSM, and measured caliper. Over time, you build a reference library you can consult without re-measuring.
- If you use multiple paper brands, label each ream with a piece of tape showing the measured caliper — saves time when you're loading a job quickly.
- For sublimation and heat press work, always re-measure when you open a new batch from the same supplier. Lot-to-lot variation is real and affects pressure settings.
- Store your calipers in their case with a small silica gel packet. Moisture causes metal instruments to corrode and drift over time.
Choosing the Right Paper Using Thickness Data
Reading GSM and Caliper Together
GSM and caliper tell you different things. Use both together for the full picture:
| Paper Type | Typical GSM | Typical Caliper (mm) | Common Use |
|---|---|---|---|
| Standard copy paper | 75–80 | 0.05–0.09 | Everyday documents, draft prints |
| Premium inkjet paper | 90–100 | 0.09–0.12 | Photo-quality prints, presentations |
| Sublimation transfer paper | 90–120 | 0.10–0.14 | Dye-sublimation on polyester and hard substrates |
| Heat transfer paper | 100–140 | 0.12–0.18 | Iron-on and heat press transfers on fabric |
| Light cardstock | 160–200 | 0.18–0.22 | Greeting cards, menus, lightweight packaging |
| Heavy cardstock | 250–300 | 0.25–0.35 | Business cards, thick craft projects, covers |
| Printable vinyl | 150–180 (equivalent) | 0.08–0.12 (film only) | Stickers, decals, Cricut and vinyl cutting projects |
| Tracing paper | 60–90 | 0.05–0.08 | Drafting, overlays, craft tracing |
Notice how sublimation paper and standard inkjet paper can share similar GSM values but behave differently in a printer — the coating chemistry changes how the paper feeds and how ink is absorbed. This is why measuring caliper directly, rather than relying on GSM alone, gives you the most actionable data.
Matching Paper Thickness to Your Project
Different output types demand different thickness ranges. Here's how to match them:
- Laser printers: Typically handle up to 200 GSM / ~0.22 mm. Check your manual — exceeding the limit warps the fuser. Our breakdown in laser vs inkjet printer covers media compatibility in detail.
- Inkjet printers: More forgiving, often handling up to 300 GSM / ~0.30 mm on specialty media trays. Thicker sheets often need to go through a straight-through paper path if your model has one.
- Heat press transfers: Transfer paper in the 0.12–0.18 mm range performs consistently at standard time/temperature/pressure settings. Go thinner and you risk scorching; go thicker and transfer may be incomplete. For a complete overview, see our guide on the basics of t-shirt heat printing.
- Vinyl cutting: Blade depth must match material thickness. Measure your vinyl + carrier sheet together before setting blade depth in your machine software.
- Laminators: Add the paper caliper plus the pouch thickness — the total must fall within your laminator's rated range to get smooth, bubble-free results.
Keeping Your Measuring Tools Accurate Over Time
Cleaning and Storage
A dirty or corroded instrument gives bad readings. Keep your tools in working order with these habits:
- After each session, wipe the contact faces with a lint-free cloth lightly dampened with isopropyl alcohol.
- Never use paper towels — they leave fibers on the measuring surfaces.
- Store digital calipers and micrometers in their original cases, slightly open so the jaws don't rest under tension.
- Remove batteries from instruments you won't use for more than a month. Leaking batteries destroy electronics and are expensive to fix.
- Keep tools away from paper dust. Fine paper fibers are abrasive over time and will pit measuring surfaces.
Calibration and Verification
Calibration drifts. Even a quality instrument needs regular verification, especially in a busy print or craft environment.
- Zero check: Do this every single time you use the tool. Close the instrument with no material between the faces. It should read exactly 0.00 mm.
- Reference check: Use a precision gauge block (available cheaply online) to verify accuracy at a known thickness — typically 1.00 mm or 2.00 mm. If your instrument reads outside ±0.01 mm on a gauge block, it's time to recalibrate or replace.
- For digital models, most have a built-in zero/calibrate button. For analog micrometers, use the adjustment wrench that ships with the tool.
- If your instrument consistently reads high or low by the same amount, note that offset and apply it to all measurements until you can send it in for calibration.
- Professional calibration services are available for around $20–$50 and are worth it if you rely on measurements for production work.
Frequently Asked Questions
What unit is paper thickness measured in?
Paper thickness is commonly measured in millimeters (mm), mils (thousandths of an inch), or micrometers (µm) in professional settings. For everyday crafting and printing, millimeters are the most practical unit — most digital calipers and micrometers display in both mm and inches, so you can switch based on what your printer manual or project spec uses.
What is the difference between GSM and caliper?
GSM (grams per square meter) measures the weight of paper per unit area. Caliper measures the actual physical thickness. A high-GSM paper is heavier, and usually thicker — but coated or dense papers can have high GSM with relatively low caliper. Always measure caliper directly when thickness matters for fit, feed, or pressure settings.
How thick is standard copy paper?
Standard 80 GSM copy paper measures approximately 0.10 mm (100 micrometers or about 4 mils). Slightly lighter 75 GSM paper runs around 0.08–0.09 mm. These are the baseline numbers to keep in mind when comparing heavier stocks or specialty papers.
Can I measure paper thickness without a micrometer?
Yes. A digital caliper is the next best option and handles most crafting and printing applications well. In a pinch, you can use a feeler gauge set to check whether a sheet falls within a specific thickness range. For rough sorting — not precise measurement — holding a stack of 100 sheets and dividing the total by 100 using a ruler also works.
Does paper thickness affect print quality?
Directly. Thickness affects how paper feeds through rollers, how ink or toner sits on the surface, and how heat transfers bond to the sheet. Paper that's too thin may wrinkle or allow ink to bleed through; paper that's too thick may jam, fail to receive ink evenly, or not release transfer dyes completely in sublimation applications.
What paper thickness works best for heat press transfers?
Most heat transfer papers perform best in the 0.12–0.18 mm (120–180 µm) caliper range. Within that range, standard press time, temperature, and pressure settings produce clean, complete transfers. Outside that range — especially if you're going thicker — you need to adjust pressure and time, or risk incomplete bonding or scorching.
How do I know if my paper is too thick for my printer?
Check your printer's manual for the maximum supported media weight in GSM and the maximum caliper (often listed in mm or mils). If your paper's measured caliper exceeds that spec, don't run it through the standard tray. Some printers have a straight-through or rear paper path designed for thicker media — use that instead when available.
How often should I calibrate my measuring tool?
Zero-check before every use. Full verification against a gauge block should happen every three to six months with regular use, or any time the instrument has been dropped or subjected to impact. If you use your tools in a production environment daily, monthly verification is a reasonable standard to maintain accuracy.
Key Takeaways
- Use a digital micrometer or caliper to get a direct caliper measurement — GSM from the package alone is not enough when mechanical fit matters.
- Always stack 10 sheets, measure once, and divide by 10 for the most accurate single-sheet caliper reading.
- Match your paper's measured caliper to your printer's, heat press's, or cutter's rated media range before running any job.
- Zero-check your instrument before every session and verify against a gauge block every few months to keep measurements reliable over time.
 |  |  |  |

About Karen Jones
Karen Jones spent seven years as an office manager at a mid-sized financial services firm in Atlanta, where she was responsible for a fleet of more than forty inkjet and laser printers spread across three floors, managed ink and toner procurement contracts, and handled first-line troubleshooting for connectivity failures, paper jams, and driver conflicts before escalating to IT. That daily exposure to printers from Canon, Epson, HP, and Brother under real office conditions gave her a practical command of setup, maintenance, and common failure modes that spec sheets never capture. At PrintablePress, she covers printer how-to guides, setup and troubleshooting tips, and practical advice for home and office printer users.


Get some FREE Gifts. Or latest free printing books here.
Disable Ad block to reveal all the secret. Once done, hit a button below
| | | |