How Does Vinyl Cutting Work
by Marcus Bell · March 29, 2022
The global vinyl cutting market generates over two billion dollars in annual sales, spanning crafters, small businesses, and commercial sign makers who rely on it daily. If you've ever asked how does vinyl cutting work, the core process involves a blade-driven plotter tracing digital vector paths through adhesive film and leaving crisp shapes behind. You weed out the unwanted areas by hand, then transfer the finished design to nearly any flat surface. Browse our vinyl and Cricut section for project guides, machine reviews, and technique breakdowns that expand on everything covered here.
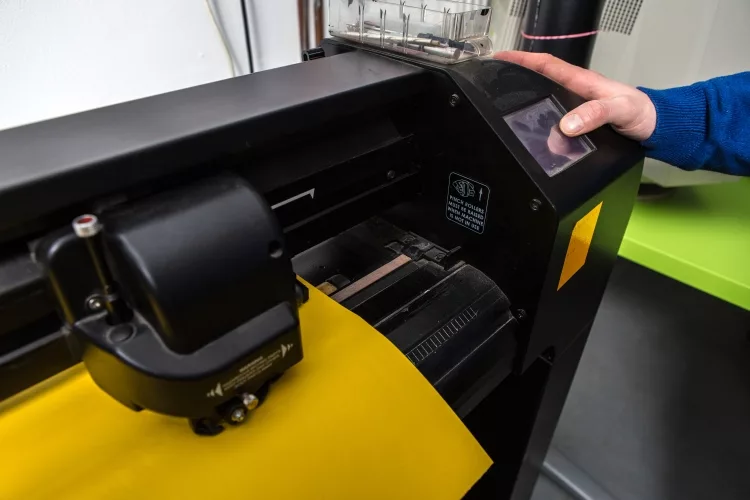
Vinyl cutting is a subtractive process, which means the machine removes material rather than depositing it. That places it in a fundamentally different category from inkjet or screen printing. A small carbide or steel blade sits inside a freely rotating housing, trailing naturally in the direction of travel so it cuts smooth curves without the head physically swiveling. You control two key variables — blade depth and cutting pressure — and those settings determine whether the vinyl layer separates cleanly from the backing sheet beneath it.
Getting consistent results from a vinyl cutter depends on understanding each stage of the workflow, from file format and machine settings to material choice and application method. Once you understand how does vinyl cutting work at a mechanical level, diagnosing cut-quality problems becomes systematic rather than guesswork.
Contents
- How Does Vinyl Cutting Work? The Core Technology Explained
- What Most People Get Wrong About Vinyl Cutting
- How Vinyl Cutting Shows Up in Everyday Creative Work
- Vinyl Cutting vs. Other Decoration Methods
- What Vinyl Cutting Does Well — And Where It Falls Short
- The Habits That Separate Good Cuts from Great Ones
- The Errors That Ruin Vinyl Projects
- What You Can Expect to Spend on Vinyl Cutting
- Frequently Asked Questions
How Does Vinyl Cutting Work? The Core Technology Explained
The Role of Vector Files and Software
Every vinyl cut begins as a vector file, because vectors define shapes as mathematical paths rather than pixel grids and give the cutter exact coordinates to follow at any size. Programs like Cricut Design Space, Silhouette Studio, and Adobe Illustrator generate these cutting paths, and most modern machines connect to their companion software via USB or Bluetooth. When you send a design to the machine, the software translates your vector paths into motor commands that control blade position, speed, and when the blade lifts between disconnected shapes. If your source file is a raster image — a JPEG, PNG, or similar format — you'll need to convert it to a vector by tracing the outlines first. That trace quality directly determines the sharpness of your final cut edges.
Blade Mechanics and Material Interaction
The blade housing rotates freely on its axis rather than being locked at a fixed angle, which is how the machine cuts clean curves in any direction without physically turning the head. Blade depth is set mechanically by adjusting how far the tip extends from the housing, while cutting pressure is controlled through the machine's software or on-board panel. Thinner adhesive vinyl cuts cleanly with lower pressure, while heat-transfer vinyl requires more force because its carrier layer adds thickness to the material stack. According to Wikipedia's article on vinyl cutters, these machines evolved from commercial sign-making plotters developed in the 1980s, long before the hobby and craft market adopted them widely.
What Most People Get Wrong About Vinyl Cutting
The "Any Image Will Work" Misconception
One of the most persistent beginner assumptions is that any image you find online can be loaded directly into the cutter software and sent to the machine, but that's not how the process works. Raster images contain no path data, so the cutter has nothing to follow until you create a vector version of the design. Photos with gradients, soft shadows, or fine photographic detail are especially problematic because vinyl cutting produces only solid shapes. It cannot replicate tonal transitions the way sublimation printing can, and treating the two methods as interchangeable leads to consistent disappointment. Designs with clean outlines, bold forms, and limited colors translate into vinyl consistently and cleanly.
Pressure and Speed Are Not Universal
Another common myth is that one set of machine settings works across all materials and that you configure the cutter once and never revisit it. In practice, two rolls of the same vinyl from different manufacturers can require different pressure to cut cleanly through. Blade wear adds another variable — a blade that has cut several feet of material needs slightly more pressure than a fresh one to achieve the same result. Cutting speed matters too, because going too fast causes the blade to skip on tight corners and small lettering. Treating the machine's presets as starting points rather than final settings, and running a test cut before every new material, prevents most problems before they reach your actual project.
How Vinyl Cutting Shows Up in Everyday Creative Work
Home Decor and Personalization Projects
Vinyl cutting is behind a large share of the personalized home decor sold at craft markets and online shops, from custom wall quotes and kitchen labels to monogrammed mugs and seasonal window clings. If you've considered making your own vinyl wall decals, the process starts with cutting adhesive vinyl, weeding away the background, and using transfer tape to position the design on the wall cleanly. Smooth, non-porous surfaces like glass, painted drywall, and glazed ceramic accept adhesive vinyl easily and hold it reliably over time. Textured or rough surfaces require more care, and outdoor applications call for exterior-rated cast vinyl rather than the economy calendared film sold at most craft retailers.
Small Business and Commercial Applications
Commercially, vinyl cutting powers vehicle graphics, window displays, custom apparel, and product signage across a wide range of industries. Small print shops often pair a vinyl cutter with a heat press to produce custom t-shirts and bags using heat-transfer vinyl, a workflow that eliminates screens, wet inks, and drying time entirely. For multi-color designs with tightly aligned layers, knowing how to use registration marks for multi-color vinyl projects is one of the most practical skills you can add to your process. Wide-format professional cutters from brands like Roland operate at 60 inches or wider, while hobbyist machines like the Cricut Maker typically max out near 12 inches per pass.
Vinyl Cutting vs. Other Decoration Methods
Where Each Method Excels
Vinyl cutting fills a specific niche among decoration options, and knowing how it compares to alternatives helps you choose the right tool for each job. When you need full-color photographic output on polyester garments, sublimation printing delivers far greater color depth than vinyl can match. If you're weighing adhesive film against inkjet-based options for fabric projects, the comparison of heat transfer paper vs. vinyl covers the durability and print detail tradeoffs in practical terms. For apparel businesses deciding between a heat-press workflow and a screen printing setup for larger runs, the breakdown of heat press vs. screen printing walks through the economics of each approach.
| Method | Startup Cost | Best Application | Color Range | Min. Quantity |
|---|---|---|---|---|
| Vinyl Cutting | Low–Medium | Decals, signage, solid-color apparel | Solid colors only | 1 piece |
| Screen Printing | Medium–High | Large apparel runs, spot-color graphics | Up to 6–8 spot colors | 12–24 pieces |
| Sublimation Printing | Medium | Full-color on polyester and hard goods | Full color (unlimited) | 1 piece |
| Heat Transfer Paper | Low | Full-color prints on light-colored fabrics | Full color (inkjet) | 1 piece |
| DTG Printing | High | Detailed full-color garment graphics | Full color (unlimited) | 1 piece |
The table highlights one of vinyl cutting's clearest competitive strengths: zero minimum order quantity and no per-run setup cost. You can produce a single custom decal as efficiently as a batch of twenty, which is genuinely difficult to match with screen printing or DTG. The tradeoff is that vinyl is limited to solid color shapes, making it a poor fit for photographic or gradient-heavy artwork that printing methods handle naturally.
What Vinyl Cutting Does Well — And Where It Falls Short
The Advantages Worth Knowing
Vinyl cutting combines low startup cost, fast turnaround, and high precision in a way that's difficult to match for bold, graphic designs at small quantities. The machines are desktop-sized, require no ventilation or specialized facility setup, and entry-level models start well under two hundred dollars. Heat-transfer vinyl produces durable, professional-looking results on fabric that survive repeated washing when you apply them at the correct heat press temperature and time settings specified by the vinyl manufacturer. For hard surface applications, adhesive vinyl is nearly instant — cut, weed, apply, and the project is finished within minutes of completing the design.
The Limitations to Plan Around
The same mechanical precision that makes vinyl accurate also constrains what the process can produce. Every color in a multi-layer design requires a separate cut and a separate application pass, which makes complex full-color artwork impractical compared to a digital printing method. Very fine details — thin letterforms, delicate line work, and text under roughly half an inch tall — are difficult to weed cleanly and tend to lift at the edges over time. Vinyl also carries a finite outdoor lifespan tied to the grade you choose: economy calendared vinyl typically lasts two to three years in direct sun, while premium cast vinyl is rated for five to seven years under comparable conditions.
The Habits That Separate Good Cuts from Great Ones
Material Prep and Machine Calibration
Storing your vinyl rolls upright in a cool, dry space prevents the warping and curl that cause feeding problems during cutting. Before loading any sheet, confirm that the pinch rollers sit squarely on the grit wheels and that the material feeds straight into the machine without angling. Running a test cut — typically a small square with a triangle inscribed inside — before starting your actual design takes under two minutes and tells you immediately whether your pressure and blade depth are set correctly. For tricky materials like glitter vinyl or flock, a strip of painter's tape across the test area stabilizes the surface and makes the result easier to read. If you plan to apply vinyl to transparent substrates, the guide on applying vinyl to acrylic and plexiglass covers the surface preparation that determines whether you get a clean bond or a bubbled one.
Weeding and Transfer Techniques
Weeding — removing the cut vinyl you don't want — requires patience and the right tool, especially for designs with small interior pieces or tightly packed lettering. A fine-tipped weeding hook gives you control over individual cut segments without disturbing neighboring pieces, and a bright work light makes cut lines visible in the vinyl surface. Once the design is weeded, standard application tape picks it up and holds it in position during transfer, and pressing firmly from the center outward with a squeegee removes air bubbles before they can set. For multi-color layered projects, registration marks give you reliable alignment guides so you're not estimating layer placement by eye on every pass.
The Errors That Ruin Vinyl Projects
Skipping the Test Cut
The single most damaging habit you can develop in vinyl cutting is loading a full sheet and sending your design without running a test cut first. A test cut is a small shape — usually a square with an inscribed triangle — that confirms your blade cuts through the vinyl cleanly while leaving the backing intact beneath it. If the shape peels away cleanly with no tearing and the backing shows no score marks, your settings are ready. If the vinyl tears or resists lifting, reduce pressure or blade depth in small increments. If it doesn't cut all the way through, increase pressure and test again before committing to your actual sheet. That two-minute check prevents wasted material and frustration on every project you run.
Diagnosing Cuts That Don't Go Right
When cuts come out wrong, a methodical approach to identifying the cause is far more efficient than changing multiple settings at once. Ragged or torn edges typically point to a dull blade, too much cutting speed, or a blade depth set so deep it drags the material rather than slicing cleanly through it. Cuts that don't go all the way through despite correct-seeming pressure settings usually mean the material shifted during the run, or the blade tip has worn past its useful life and needs replacement. Tracking drift — where the vinyl wanders off course during a long cut — almost always stems from uneven roller pressure or a sheet that wasn't loaded square to the feed direction. Adjust one variable at a time and run a fresh test cut after each change to understand exactly what made the difference.
What You Can Expect to Spend on Vinyl Cutting
Machine Costs at Every Level
The entry point for vinyl cutting is genuinely accessible, with hobbyist machines like the Cricut Joy starting around one hundred dollars for basic cutting tasks. More capable models like the Cricut Maker or Silhouette Cameo range from two hundred fifty to four hundred dollars depending on the bundle and included accessories. Professional sign-making cutters from Roland and Graphtec occupy a separate tier entirely, with 24-inch desktop models starting near eight hundred dollars and production-grade wide-format machines running several thousand. For most crafters and small business operators, a mid-range machine in the two-hundred-to-four-hundred-dollar range provides ample cutting force, software capabilities, and material compatibility for the vast majority of projects you'll encounter.
Ongoing Vinyl and Supply Expenses
Beyond the machine, your recurring costs include vinyl rolls, transfer tape, replacement blades, and cutting mats if your machine requires them. Economy adhesive vinyl runs roughly twenty-five to forty cents per square foot when purchased in bulk rolls. Premium cast vinyl and specialty finishes like chrome, holographic, or flock cost two to four dollars per square foot. Replacement blades run five to fifteen dollars apiece depending on brand, and a blade used on lighter materials regularly can last several months before performance noticeably degrades. Per project, the material cost for a standard 12-by-12-inch vinyl decal typically lands between fifty cents and two dollars, which makes vinyl cutting one of the more economical customization methods available when you're working at single-unit quantities.
Frequently Asked Questions
What materials can a vinyl cutter handle besides adhesive vinyl?
Most vinyl cutters work with cardstock, paper, heat-transfer vinyl, fabric backed with stabilizer, and thin foam sheets. Higher-end machines like the Cricut Maker can also cut leather, balsa wood, and specialty materials when you swap in the correct blade type matched to each material's hardness and thickness.
Do you need design software experience to start vinyl cutting?
Hobbyist machines like the Cricut and Silhouette come with companion software that includes pre-made design libraries and simplified vector tools, so professional design experience isn't required to get started. Learning a program like Inkscape or Adobe Illustrator, however, gives you significantly more control over original designs as your projects become more ambitious.
How does vinyl cutting work for heat-transfer vinyl on shirts?
You cut the design mirrored, weed away the negative space so only your design remains on the carrier sheet, position it on the fabric, and press it with a heat press at the temperature and time the vinyl manufacturer specifies. The carrier sheet holds everything in place during pressing and peels away cleanly once the adhesive bonds to the fabric fibers under heat and pressure.
What is the difference between cast and calendared vinyl?
Calendared vinyl is made by passing vinyl compound through rollers, which leaves internal stress in the material and makes it better suited for flat surfaces and short-term indoor applications. Cast vinyl is made by spreading liquid PVC over a mold, producing a more flexible, dimensionally stable film that conforms to curves and holds up in outdoor conditions for significantly longer periods.
Can a vinyl cutter produce full-color images?
A vinyl cutter cannot print — it only cuts shapes from pre-colored sheets, so every color in a design requires a separate piece of vinyl. For full-color photographic output, you would need a method like sublimation, inkjet heat transfer, or direct-to-garment printing, all of which deposit multiple colors in a single pass without any manual layer alignment.
How long does vinyl last when applied to outdoor surfaces?
Economy calendared vinyl typically fades and begins to lift within two to three years of direct outdoor sun exposure. Premium cast vinyl is rated for five to seven years under comparable conditions when applied to a clean, properly prepared surface. The substrate material, local climate, and how much direct sunlight the surface receives all influence how close to the rated lifespan you'll actually achieve.
Vinyl cutting rewards the crafters who understand the process — from vector path to blade depth to transfer tape — because that knowledge turns every session from guesswork into precision.
 |  |  |  |
About Marcus Bell
Marcus Bell spent six years as a production manager at a small-batch screen printing shop in Austin, Texas, overseeing everything from film output and emulsion coating to press registration, squeegee selection, and garment finishing. He expanded into vinyl cutting and Cricut projects when the shop added a custom apparel decoration line, giving him direct experience with heat transfer vinyl application, weeding techniques, and the real-world differences between Cricut, Silhouette, and Brother cutting machines. At PrintablePress, he covers screen printing, vinyl cutting and Cricut projects, and T-shirt printing and decoration techniques.


Get some FREE Gifts. Or latest free printing books here.
Disable Ad block to reveal all the secret. Once done, hit a button below
| | | |