How to Print on Heat Transfer Paper
by Karen Jones
Printing an image onto a t-shirt using transfer paper is quite a fun thing to do when you know what to do. There is no frustration as the steps are very easy to follow and the results will be well worth the effort. Not only will you produce awesome t-shirts that you can even sell to clients, you will be able to do so without spending too much.
You will need your transfer paper, your inkjet or laser printer, ordinary print paper (for testing purposes), your heat press machine, your computer (and design or illustration software), an iron (or steamer) to get your t-shirt nice and smooth, and of course, your t-shirt.
Let’s get started:
Contents
Select the Transfer Paper
Not every transfer paper is the same. You would need to carefully select the transfer paper that will meet your needs. That means, your design, as well as fabric, may call for a specific transfer paper that is also compatible with the printer you will be using. You will need to also select either an inkjet or a laser transfer paper. The kind of t-shirts you will be working with – whether light or dark colored – will also determine the transfer paper you select since each type of t-shirt will require a different paper. Read the labels before you select your transfer paper. Once you have made the right selection, you are good to go.
Prepare Your T-Shirt
You might at this point need to prepare your t-shirt to accept the transferred image. Getting your t-shirt ready means removing moisture and wrinkles. You may do so by ironing your t-shirt beforehand or if you prefer you could use the heat press to remove the moisture. Make sure to use a Teflon sheet to protect the shirt from burns while you do so. Otherwise, ironing the t-shirt is enough to remove the moisture and wrinkles at the same time.
Prepare the Artwork
Preparing your artwork is easy once you have selected your transfer paper and your t-shirts or fabrics. You might even call this the fun part. Here you use your computer and illustration software (whether it is the Adobe Illustrator, Corel Draw, or similar software) to create your designs. At this point, you would want to get your colors, size, and resolution right so that your artwork looks perfect on the transfer paper. One thing to remember is to choose mirror image (to flip your artwork) in your printer settings before you print. If you fail to mirror your image before you place it on your transfer paper, it will transfer on the t-shirt as a reverse image. This flaw will look quite obvious when texts are involved. In preparing your artwork you have the opportunity to make any changes you like before you produce the final design that will go on your transfer paper.
Test the Print
Before you mass produce your design, do a test print on ordinary printer paper. This is a good idea to see whether your design will come out perfectly in the final production. If things are less than professional looking or are a mess, you would need to make changes. You may need to do more than one test as you make your adjustments to get your colors, lines, and other features right in your design. If your test print comes out perfectly, it’s OK to proceed to the real printing.
Set the Heat Press Machine
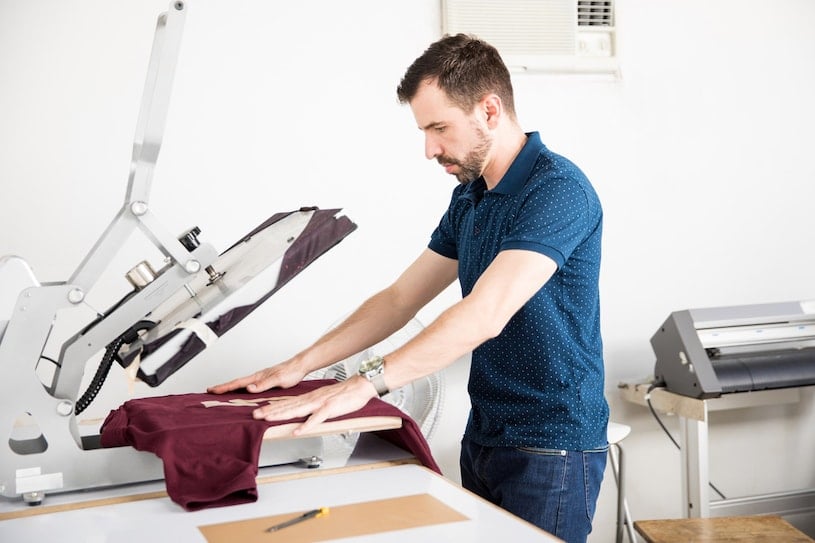
Setting your heat press machine is necessary in order to get started in producing your printed t-shirt.
Adjust the temperature with the thermostat knob or temperature controls. You would need to know which temperature to set your heat press machine to allow you to successfully complete your heat transfer task.
Adjust the pressure that you will need for the heat transfer job. The pressure you need depends on how thick your fabric is. Thicker fabrics need more pressure compared with thinner fabrics.
Set the timer to the desired time for the job. The timer display will show you the time in minutes and seconds. Make your adjustments before you place the heat transfer paper and t-shirt on the machine.
Allow your heat press machine time to warm up. This you can do after you have set your timer and temperature. Some heat press machines will beep or alarm to indicate when the time is up and the heat press is warm.
Insert Your T-Shirt
Carefully insert your transfer paper with the printed design, the t-shirt you will be printing on and a Teflon sheet (to protect the t-shirt etc) into the heat press. You may also need to place another fabric below the t-shirt to protect it and prevent dirt and other foreign particles from touching it.
Make sure everything is centered on your heat press.
Transfer Your Image
Close the heat press to transfer your image onto the t-shirt.
Once the time is up, open the heat press and remove your t-shirt.
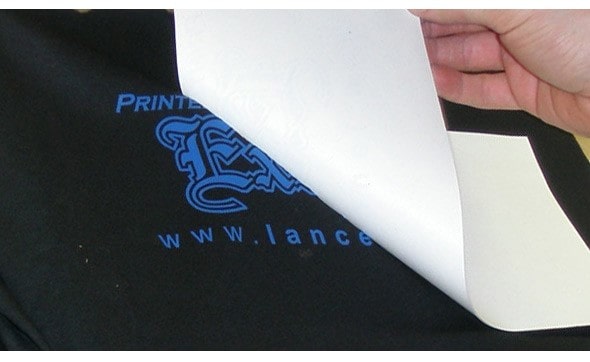
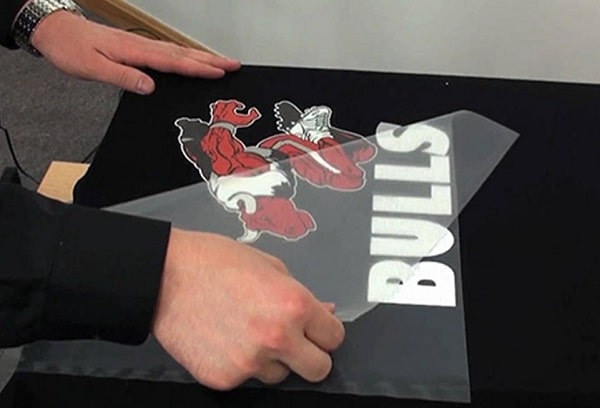
Peel
Depending on the transfer paper you are using, as well as the design and fabric, you can peel the
transfer paper either hot or cold. Either way, once you peel your transfer paper, you should see the image on the t-shirt and your transfer paper should be completely blank.
Great! You have successfully transferred your design onto your t-shirt by yourself. Now you can make ti shirt using transfer paper.
Good luck!
 |  |  |  |

About Karen Jones
Karen Jones has always been a writer at heart. As a freelance writer and social media marketing consultant for the last decade, she's honed her skills in crafting catchy and interesting articles that reel in readers. She also enjoys traveling, which is where she gets most of her ideas for her writing. In fact, if you can't find Karen around her friends and family, it's likely because she's holed up in her home office working on refining her writing composition and printing press!
Thoughts on "How to Print on Heat Transfer Paper"
| | | |
Popular Posts
Get some FREE Gifts. Or latest free printing books here.
Disable Ad block to reveal all the secret. Once done, hit a button below
| | | |